Configuring Server B


Configuring Server B


To configure Server B, do the following:
  1.  Start Server B using the ServeRAID Configuration Diskette. At this time, leave Server A turned off.
  2.  Perform the configuration of the ServeRAID adapter and set the SCSI IDs for the adapter by doing the following:

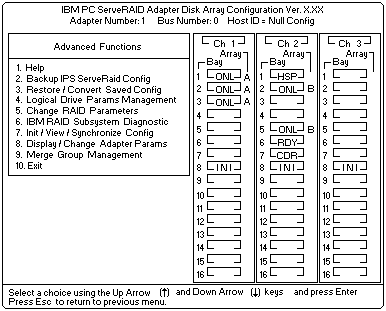
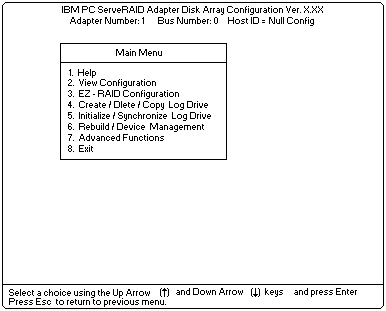
    1.  Select Advanced Functions from the Main Menu of the configuration program.
       

        -Important- If you already have logical drives defined that you wish to keep,  go to (below) step 2f.
       The stepsprior to step 2f will cause loss of data by deleting all logical drives already defined.

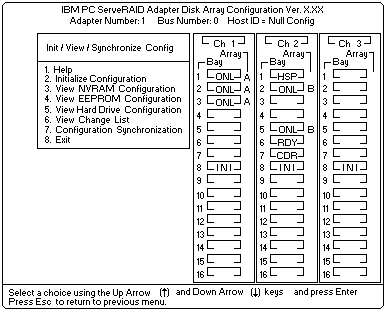
    2.  Select Init/View/Synchronize Config from the Advanced Functions menu.
       
    3.  Select Initialize Configuration to initialize the adapter configuration.
       
    4.  When complete, press the Esc key to return to the Advanced Functions menu.
       The Confirm pop-up window appears.
    5.  Select Yes to save the changes, or select No to return the setting to its original state;  then, press Enter.
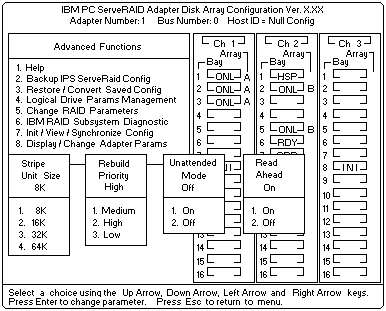
    6.  From the Advanced Functions menu, select Change RAID Parameters and enable the unattended mode.
       A screen similar to the following appears.
       
      Note: For descriptions of the RAID parameters, refer to the 'IBM ServeRAID Adapter Installation and User's Guide'

    7.  Use the Up Arrow (  ), Down Arrow (  ), Left Arrow (<), or Right Arrow (>) keys to highlight the  unattended mode parameter you want to change; then, press Enter to change the parameter.

      Note: The stripe unit size for Server B must be set to the same setting as Server A.

    8.  When complete, press the Esc key to return to the Advanced Functions menu.
       The Confirm pop-up window appears.
    9.  Select Yes to save the changes, or select No to return the setting to its original state; then, press Enter.
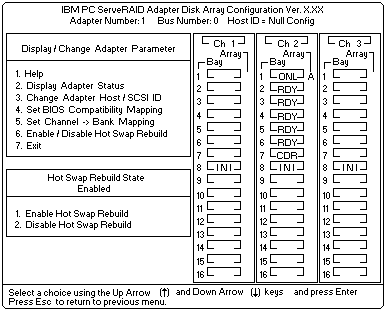
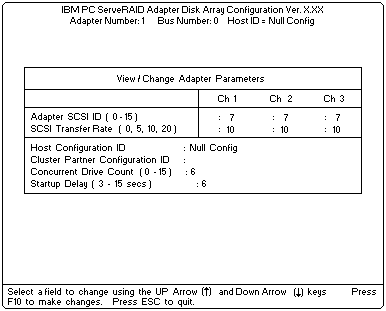
    10.  From the Advanced Functions menu, select Display/Change Adapter Parameters.
       A screen similar to the following appears.
       
    11.  Select Change Adapter Host/SCSI ID.
       A screen similar to the following appears.
       
      Note: Do not attempt to change the host ID on both ServeRAID II adapters in a pair at the exact same time.  Doing so can cause a problem, such as a server lock-up .

    12.  To select a field on this screen, use the Up Arrow (  ) key or Down Arrow (  ) key.
    13.  Change the SCSI ID for the adapter on the channels that will be shared, to SCSI ID 7, the default setting is 7.
       Normally, nonshared channels are set to SCSI ID 7.

        -Important- If your configuration will contain multiple ServeRAID adapter pairs, each adapter Host  Configuration ID must be unique.
       Do not assign a Host configuration ID or Cluster Partner configuration ID to adapters that do not contain any shared channels.

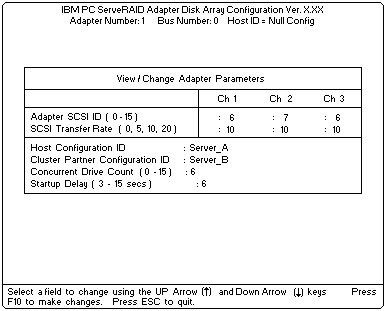
    14.  Enter a name for the Host Configuration ID for Server B for example, Server_B.

      Note: The name of the Host Configuration ID is case-sensitive.

    15.  Enter the name that you used for the Host Configuration ID for Server A, referred to as the Cluster  Partner Configuration ID on the screen, for example, Server_A.
       You will see a screen similar to the following:

      Note: The name of the Cluster Partner Configuration ID is case-sensitive.


        -Important- Be sure to record the SCSI IDs, Host Configuration IDs, and Cluster Partner Configuration IDs  in a safe place for future reference.
       You will need this information to recover the configuration if the ServeRAID II adapter should fail.

    16.  Record the SCSI IDs, Host Configuration IDs and the Cluster Partner Configuration IDs.
    17.  Press F10 to exit. The Confirm pop-up window appears.
    18.  Select Yes to save the changes, or select No to return the setting to its original state; then, press Enter.
    19.  Continue to press Esc until you return to the Main Menu of the configuration program.

  3.  Create a hot-spare/standby hot-spare device, if desired. To define hot spares for this system:

    1.  Choose Create/Delete/Copy Log Drive from the Main Menu.
    2.  Select Define/Undefine a Hot-Spare Drive from the Create/Delete/Copy menu.
    3.  Select the device to be defined as a Hot-Spare Drive. Be sure that:

        1) Hot spares are defined to shared channels for shared adapter pairs.
        2) When selecting a hot-spare device, ensure the device has not been defined
        on the partner adapter. Use the information recorded in step 6c2.

      Note: Hot-spare/standby hot-spare (HSP/SHS) devices are defined only on a shared channel  and each adapter needs its own HSP/SHS device defined; therefore, the same HSP/SHS device is not defined on adapter pairs.


You have now completed the configuration for your ServeRAID II adapters and hard disk drives, which represents the initial installation steps for a high-availability cluster solution, using Microsoft Windows NT Server Enterprise Edition.


Now that you have installed and configured the ServeRAID Adapter and hard disk drives, install a high-availability cluster solution using Windows NT with the following procedure:

  1.  Install Microsoft Windows NT Server Enterprise Edition and update to Service Pack 3 on both servers,  but do not install the MSCS software. When the system prompts you, deselect the option to install  MSCS. It will be installed later in this procedure.

     If Service Pack 4 has been previously applied and network resources fail to come online, you must  enable NETBIOS for this address for the IP resources contained within this group through the Cluster  Administrator.
     For information on the Cluster Administrator, refer to the Microsoft Cluster Services documentation.
     If ServicePack 4 has not been previously applied, do not install ServicePack 4 at this time.

     For information on installing Windows NT Server Enterprise Edition, refer to the documentation that is  included with the software.
     When you are finished, return to this section and continue with this procedure.

  2.  Format all shared logical drives and assign drive letters to them by doing the following:

      -Important- Before using the IPSHAHTO.EXE program, use the Administration and Monitoring Utility to scan  for new devices.

    1.  On Server A, run the utility IPSHAHTO.EXE from the ServeRAID NT Cluster Solutions Diskette by  typing the following command from a Windows NT command line or from the Add/Remove Programs control panel:

      a:\support\ipshahto

       This utility will make all the shared logical drives available for access by Server A.

      Note: It is helpful if part of the volume label that you assign contains the drive letter that is  assigned to a drive, such as drive_E.

    2.  Using the Windows NT Disk Administrator, format all shared logical drives as Windows NT File System (NTFS),  and assign volume labels and drive letters to each.

        -Important- Before using the IPSHAHTO.EXE program, use the Administration and Monitoring Utility to  scan for new devices.

    3.  On Server B, run the same utility, IPSHAHTO.EXE, to make all shared logical drives available for access by Server B.

      Note: The volume label is used as a guide to make sure the same letters are assigned on Server  B as were assigned on Server A.

    4.  Using the Windows NT Disk Administrator, assign the same drive letters that you assigned to each drive on Server A.
    5.  Run IPSHAHTO.EXE from Server A again to regain control of all shared logical drives to that server.

  3.  Install the MSCS software.

    Note: The directory name and path where the MSCS software is installed must be the same on both servers.

     To start the installation, do the following:

      -Important- You must use the localquorum option when installing the MSCS software with ServeRAID.

    1.  Insert the Windows NT Server Enterprise Edition Component CD-ROM  into the CD-ROM drive on Server A and issue the following command, either from a command line or from Add/Remove  Programs in the Control panel:

      Note: The localquorum parameter must be typed in lowercase as shown.

        \MSCS\CLUSTER\I386\SETUP /localquorum

      Note: A localquorum drive will be installed on the server local/boot drive. Later in this procedure,  the localquorum drive must be moved to a ServeRAID logical array resource.
       Instructions are given when this needs to be done.

    2.  Install the MSCS software following the instructions in the documentation that comes with the MSCS software.

       Server A will restart when the installation is completed.

  4.  To make Server B join  the cluster, do the following:

    Note: The directory name and path where the MSCS software is installed must be the same on both  servers.

    1.  Insert the Windows NT Server Enterprise Edition Component CD-ROM  into the CD-ROM drive on  Server B and issue the following command, either from a command line or from Add/Remove Programs in the Control panel:

        \MSCS\CLUSTER\I386\SETUP

    2.  Install the MSCS software following the instructions in the documentation that comes with the MSCS software  to have Server B join the newly created high-availability cluster solution.

       Server B will restart when the installation is completed.

  5.  Make Server A the preferred owner of the cluster group by doing the following:

    1.  Run the Cluster Administrator program that comes with the MSCS software.
       Refer to the documentation that comes with the MSCS software for instructions.
    2.  Select the Cluster Group.
    3.  Display its properties window by selecting File; then, select Properties.
    4.  Click Modify, next to the Preferred Owner text box.
    5.  Select Server A and move it to the right side, into the Preferred Owners panel.
    6.  Click OK.

       Server A appears in the Preferred Owners text box.

    7.  Make sure that the Cluster Group has failover enabled.
       For instructions on how to do this, refer to the documentation that comes with the MSCS package.
    8.  Close the connection to the cluster and open it again to ensure that the connection is through Server A.

  6.  Install the IBM ServeRAID Windows NT Cluster Solution utility by doing the following:

    1.  From Server A, run the SETUP.EXE program from the ServeRAID Windows NT Cluster Solution Diskette and  follow the instructions that appear on the screen.
    2.  When complete, repeat the procedure from Server B.

       Upon completion of the installation of the utility on both servers, all shared ServeRAID II groups  and disk resources will be automatically created by the IBM Cluster Solution setup program and  then brought online. Server A will be the current owner of these groups.

  7.  Move the quorum resource from localquorum to a ServeRAID II disk resource by doing the following:

    1.  From the Cluster Administrator, select the cluster you are using by clicking the left mouse button  on the cluster name.
    2.  Click the right mouse button and select Properties to open the cluster.
    3.  In the Quorum Resource field, select a ServeRAID shared disk and click OK.

       Refer to the Microsoft Cluster Solution Administrator's Guide  for more information.

     You will need to ensure that the same server (for example, Server A) owns the ServeRAID disk  resources and the local quorum resource and that the quorum resource is moved to a RAID  level-1 logical drive.

     Shared disk resources can now be moved manually using the Microsoft Cluster Administrator utility or  automatically during failover.


Back to  Jump to TOP-of-PAGE

Please see the LEGAL  -  Trademark notice.
Feel free - send a Email-NOTE  for any BUG on this page found - Thank you.