For instructions on how to remove the ServeRAID adapter, see the IBM ServeRAID-3H and ServeRAID-3L Ultra2 SCSI Adapters Installation and User's Guide .
Before you remove the adapter, be sure to:
- Turn off the server.
- Note which SCSI cables are connected to the SCSI channel connectors on the adapter.
- Note which PCI slot has the adapter installed.
For instructions on how to install the ServeRAID adapter, see the IBM ServeRAID-3H and ServeRAID-3L Ultra2 SCSI Adapters Installation and User's Guide .
Be sure to install the adapter to the same PCI slot from which you removed the failed ServeRAID adapter.
 -Important- Do not reconnect the SCSI channel cables to the adapter at this time.
To initialize the adapter:
- Select Advanced Functions from the Main Menu.
- Select Init/View/Synchronize Config.
- Select Initialize Config.
The BIOS level of the adapter is displayed after system POST when the adapter BIOS loads.
The latest BIOS levels are available from the IBM website at
Once you have connected to this URL, search for RAID BIOS .
Download and read the text file to determine the latest levels available.
If your adapter BIOS is downlevel, download and apply the BIOS update.
To update the configuration parameters:
- Start the system from the IBM ServeRAID Configuration Diskette Version 3.00 or later.
- Select Advanced Functions from the main menu.
- Select Display/Change Adapter Params.
- Using the settings that were assigned to the ServeRAID adapter you are replacing,
select and configure each of the following parameters:
- SCSI Bus Initiator_IDs
- Adapter Host_ID
- Cluster Partner's Host_ID
- Select Change RAID Parameters from the Advanced Functions menu and enable unattended mode.
Note: Be sure to connect the cables to the correct SCSI channels as noted in (above) step 1.
-Important- If the ServeRAID adapter being replaced is the adapter that
attaches to the server startup disk array, other non-shared disk arrays, or shared arrays which have not failed over to
the other server, continue with the following steps; otherwise, restart the system normally.
- Select Advanced Functions from the Main Menu.
- Select Merge Group Management.
- Restore the adapter disk array configuration.
- To restore non-shared disk array configurations:
1) Select Merge Group Management from the
Advanced Functions menu; then, press Enter.A screen similar to the following appears.
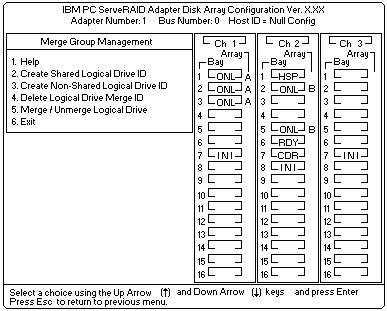
2) Select Merge/Unmerge Logical Drive and then press Enter.
3) Select Merge Own Non-Shared Logical Drive.
4) Select from the Group ID field the Merge Group ID for the array2xx
where xx is the shared SCSI Bus Initiator_ID, and then press Enter.
The Merge Group ID value is typically 206 or 207.
A message appears at the bottom of the screen sayingMerging own shared logical drive(s). Please wait...
5) When the process completes, a message appears saying
Merge/Unmerge operation completed successfully.
Press any key to continue.6) Press Esc to return to the previous menu.
Continue pressing Esc to return to the Main Menu.
If the adapter you are replacing is the startup adapter, the system will now be able to startup the operating system properly. - To restore shared disk array configurations:
Note: Usually all shared arrays will have failed over and will not need to be merged.
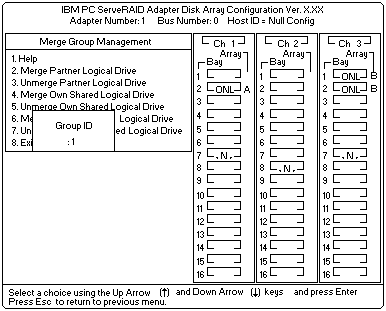
1) Select Merge Group Management from the Advanced Functions menu; then, press Enter.
A screen similar to the following appears.
2) Select Merge/Unmerge Logical Drive and then press Enter.
3) Select Merge Own Shared Logical Drive for each shared array
(Merge Group IDs in the range from 1 to 8)
that has not failed over to the cluster partner system
(for example, RAID level 5 arrays in critical or degraded state)
to restore the configuration of these shared arrays.4) Press Esc to return to the previous menu.
Continue pressing Esc to return to the Main Menu.
Repeat this process for each shared array
(Merge Group IDs in the range from 1 to 8)
that has not failed over to the cluster partner system
(for example, RAID level 5 arrays in critical or degraded state)
to restore the configuration of these shared arrays. -Important- The IBM ServeRAID Configuration Diskette must not
be used to perform failover and failback to merge or unmerge drives belonging to the other server.
Failover and failback to merge or unmerge drives belonging to the other server is normally handled by the operating system software and cluster support software.
- To restore non-shared disk array configurations:
 ) or
Down Arrow (
) or
Down Arrow (  ) and then press Enter.
Once all array configurations have been restored, the server can be restarted normally.
