Starting the Administration and Monitoring Program
Before you start the ServeRAID WIN32-Based Administration and Monitoring Program,
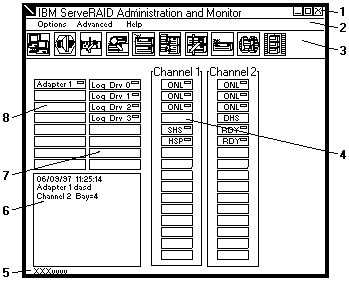
review the following illustration to become familiar with the layout of its Main screen.
| 1. Title Bar | Displays the title of the application, along with the minimize icon, |
|---|---|
| the maximize icon, and the close icon. | |
| 2. Menu Bar | Displays the pull-down menus for all supported functions. |
| 3. Tool Bar | Displays the icons for the commonly used functions. |
| 4. Device Area | Displays the state of each device connected to the physical channels |
| of the ServeRAID adapter or controller, and if applicable, its array | |
| identifier. | |
| 5. Status Bar | Displays help for the area where the cursor is currently pointing. |
| Also displays the date and time. | |
| 6. Status Window | Displays messages regarding the operational status of each adapter |
| or controller. | |
| 7. Logical Drive Area | Displays the number of logical drives created and the status of the |
| logical drive. | |
| 8. Adapter Area | Displays the number and status of the installed ServeRAID adapters |
| and controllers |
To start the WIN32-Based Administration and Monitoring Program:
or
When the Main window appears:
or
Select the host name from the pull-down list; then, click on Connect.
Note: If security is enabled on the server, you must enter a valid user name and password.
Please see the LEGAL - Trademark notice.
Feel free - send a  for any BUG on this page found - Thank you.