Installing a Microprocessor Kit and VRM - Netfinity 5600 - Type 8664
Installing a Microprocessor Kit and VRM
Note: To remove a microprocessor and VRM, reverse this procedure.
The server comes with one microprocessor installed on the processor board.
If you install an additional microprocessor kit, the server can operate as a
symmetric multiprocessing (SMP) server.
With SMP, certain operating systems and application programs can distribute the processing load between the microprocessors.
This enhances performance for database and point-of-sale applications, integrated manufacturing solutions, and other applications.
Before you begin:
 -Attention- To avoid damage and ensure proper server operation
when you install a new or an additional microprocessor, use microprocessors that have the
same cache size and type, and the same clock speed.
Microprocessor internal and external clock frequencies must be identical.
Notes:
- The illustrations in this section might differ slightly from the hardware.
- To order additional microprocessor options, contact the IBM reseller or IBM marketing representative.
- The microprocessor that is installed in microprocessor connector U5 is CPU or processor 1.
If a microprocessor is installed in microprocessor connector U6, it is CPU or processor 2.
If the server has only one microprocessor installed, that microprocessor is installed in microprocessor connector U5 and is
the startup (boot) processor.
If more than one microprocessor is installed, the microprocessor with the lower stepping level is the startup processor
and the microprocessor with the higher stepping level is the application processor.
If both microprocessors have the same stepping level, the microprocessor installed in microprocessor connector U6 is the startup
processor and the microprocessor installed in U5 is the application processor.
Note: You can determine the stepping levels of the installed
microprocessors using the Setup Utility.
See 'System Summary'.
Refer to the following illustrations while you perform the steps in this section.


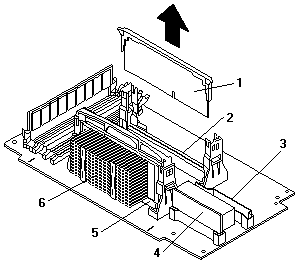
1 Terminator card
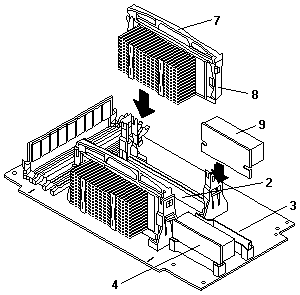
2 Microprocessor connector 2 (U6)
3 Voltage regulator module (VRM) connector for second VRM
4 VRM for first microprocessor (VRM 1)
5 Microprocessor connector 1 (U5)
6 Microprocessor 1
7 Microprocessor handle
8 Microprocessor 2
9 VRM for second microprocessor (VRM 2)
To install an additional microprocessor kit:
- Turn off the server and peripheral devices and disconnect all external cables and power cords
(see 'Preparing to install options'); then remove the cover
(see 'Removing the left-side cover (tower model)' or
'Removing the cover (rack model)'.)
- Remove the terminator card -1- from the microprocessor connector -2-.
Store the terminator card in a safe place in the static-protective package that the new microprocessor is shipped in; you will
need to install it again if you ever remove the microprocessor.
- Install the microprocessor:
- Touch the static-protective package containing the new microprocessor to any unpainted metal surface on the server; then,
remove the microprocessor from the package.
- Center the microprocessor -8- over the microprocessor connector -2 and carefully
press the microprocessor into the connector.
- Install the VRM -9- included in the microprocessor kit:
 -Attention- When installing or replacing a VRM, use only
VRMs specified for use with the Netfinity 5600 server.
Use of other VRMs might cause the server to overheat.
- Center the VRM -9- over the VRM connector -3-.
Make sure that the VRM is oriented and aligned correctly.
- Press the VRM into the connector.
Notes:
- To remove a microprocessor, pull upward on the microprocessor handle -7-.
- If you remove the microprocessor later, remember to install the terminator card
in the appropriate microprocessor connector and to remove the VRM for that microprocessor.
- If you have other options to install or remove, do so now; otherwise, go to 'Completing the installation'.
Back to 
Please see the LEGAL - Trademark notice.
Feel free - send a  for any BUG on this page found - Thank you.
 -Attention- To avoid damage and ensure proper server operation
when you install a new or an additional microprocessor, use microprocessors that have the
same cache size and type, and the same clock speed.


