If an error message is displayed
If the message UNSUPPORTED VIDEO is displayed or nothing is displayed at all, check that:
- The video interface cable is connected properly.
- The screen resolution and the vertical frequency of RS/6000 are within the supported screen resolutions in the table. If not, refer to your RS/8000 manuals, AlXwindows manuals, or online help to set the resolution and frequency to the values of the table.
lslpp -h > /tmp/ptfcheck
Press Enter.
- If the file does not include lines a, b, or c (not counting XX):
> Do not apply the PTF - If the file does include lines a, b, or c (not counting XX), but there
is also an added line:
> Do not apply the PTF. - If the file includes lines a, b, or c (not counting XX), and if there is
no added line:
> Apply the PTF.
a
nep.ddx
01.01.0003.0000 COMPLETE COMMIT xx-xx-xx xx:xx:xx root
rep.mcx
01.01.0003.0000 COMPLETE COMMIT xx-xx-xx xx:xx:xx root
nep.vdci
01.01.0003.0000 COMPLETE COMMIT xx-xx-xx xx:xx:xx root
b
nep.ddx
01.01.0002.0000 COMPLETE COMMIT xx-xx-xx xx:xx:xx root
nep.mcx
01.01.0002.0000 COMPLETE COMMIT xx-xx-xx xx:xx:xx root
nep.vdd
01.01.0002.0000 COMPLETE COMMIT xx-xx-xx xx:xx:xx root
c
nep.ddx
01.01.0002.0000 COMPLETE COMMIT xx-xx-xx xx:xx:xx root
U435340 01.01.0002.0000 COMPLETE APPLY xx-xx-xx xx:xx:xx root
nep.mcx
01.01.0002.0000 COMPLETE COMMIT xx-xx-xx xx:xx:xx root
U435333 01.01.0002.0000 COMPLETE APPLY xx-xx-xx xx:xx:xx root
nep.vdd
01.01.0002.0000 COMPLETE COMMIT xx-xx-xx xx:xx:xx root
U435334 01.01.0002.0000 COMPLETE APPLY xx-xx-xx xx:xx:xx root
If you are using more than one GXT15OM graphic adapter
Select the display with the following AIX commands, and then perform steps 6 through 16. The x indicates the number of the adapter that displays the test pattern.
chdisp -tx
dhdisp -dx
tar -xvf /dev/rfd0
Press Enter.
+--------------------------------------------------------------------------------+
|DISPLAY SERVICE AID 802084 |
| |
|The Pattern you selection will be displayed on the next screen. |
| |
|REMEMBER to use 'Cancel' to exit the screen. |
| |
|To display the pattern, press Enter. |
| |
|F3=Cancel F1O=Exit |
+--------------------------------------------------------------------------------+
Make sure that the monitor warms up (or more than 15 minutes have passed since you turned on the monitor).
NOTE: If the monitor is in standby mode ("STANDBY ON"), it might automatically turn off while you are waiting for it to warm up. Exit standby mode (refer to the explanation of STANDBY).
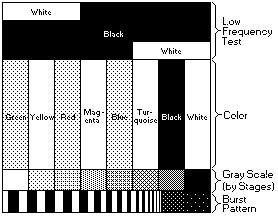
The setup main menu appears on top of the color-bar pattern:
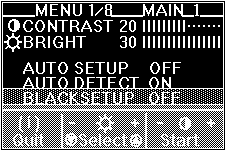
The messages are automatically displayed in the following sequence:
"OFF">"READY">"START">"COMPLETED"
and auto setup is complete.
If the screen flickers, go back to step 11 and redo the setup several times until flickering is minimized~ If the problem persists, adjust manually by using the manual-adjust menu.
The screen might be distorted during setup. This is not a problem.
If "AUTO SETUP COMPLETED" is not displayed
Go back to step 11 and redo auto setup. If the setup procedure does not complete successfully, an "AUTO SETUP FAILED" message appears. If this message appears, repeat the auto setup procedure up to three times.
If after retrying three times, you are unable to complete the setup, adjust manually by doing manual setup, or contact the Display Business Unit (DBU) helpline.
If, after you perform the auto setup, the display is still distorted, adjust by doing manual setup described in Appendix A.
- The colors must be bright and clear.
- There is no interference in the upper low frequency section, and the boundary between black and white is clear.
