Using the MAIN Menu (9516-Bxx)


Using the MAIN Menu

  1.  Push the setup switch on the back of the monitor.
     The menu is displayed:
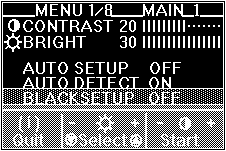
     
  2.  Push one of the brightness control buttons to select an item to set.
     If you push and hold the (-) brightness control button, the second page  of the main menu is displayed.

    Function    Explanation
    CONTRAST:    Adjust contrast. You can set values from 0 to 30.
    BRIGHT:    Adjust brightness. You can set values from 0 to 30.
    AUTO SETUP:    To start auto setup, select this item and push one of the contrast buttons.
         ('START" > "COMPLETED" are displayed in sequence until auto setup is complete.)
    AUTO DETECT:    For DOS, Windows, OS/2, or AIX windows, to enable auto setup to start automatically,
         specify ON. This is the normal setting.
    BLACK SETUP:    To adjust the black level of the screen during auto setup if the monitor is used with
         the RS/6000 and GT4 Adapter, select this item.
         This only works with the screen resolution 1280x1024.
    STANDBY:    Set the number of minutes without any input from keyboard, mouse, brightness buttons, or
         contrast buttons before the monitor enters power-saving mode. Specify OFF if you do not use
         this function. See Saving Power with Standby Mode for more details.
         You can set the following values: OFF, 5,10, ..., 60, DPMS.
    EXPANSION    To display a screen with resolution less than 1280x1024 (the resolution of the monitor),
         select the size you want by specifying one of the following:
         ON: Displays a full screen. This is the normal selection.
         OFF: Displays the screen specified by your PC.
         USER: Enables you to set the screen size by specifying H-size and
          V-size in manual-adjust menu.
         This setting can be set and saved for each screen resolution.

  3.  Push one of the contrast buttons to change the function or value for that item.
  4.  Push the setup switch to exit from the main menu. The values you set are automatically stored.


Saving Power with Standby Mode

Case A

To use the power-saving function of your PC, set STANDBY in the main menu to DPMS. The monitor then enters standby mode by receiving signals from your PC.


Case B

If there is no power-saving function in your computer, you can set the time before the monitor enters standby mode with the STANDBY parameter in the setup main menu. You must connect the keyboard, mouse, and the optional keyboard/mouse cable (P/N:83H7859) to the connectors at the rear of the monitor.


The following table shows the power dissipation and the state of indicators when the monitor is in standby mode:

Mode Power
Dissipation
Case A
(DPMS Mode)
Standby
Indicator 1
Power
Indicator
Case B
Normal
Operation
55 W (Max) - Off On -
Standby
mode 2
18 W No
horizontal
sync signal
input
On On Set time
(5 to 60
minutes)
Power-off
mode 2
8 W No vertical
sync signal
input
On On 10 minutes
after
entering
standby
mode


NOTE:

  1.  When the monitor status changes from standby mode to normal operation, the standby indicator blinks.
  2.  For the time in case A, see the manuals of your computer.  In case B, the monitor automatically enters power-off mode if there is no input for 10 minutes after entering standby mode.


Back to  Jump to TOP-of-PAGE

Please see the LEGAL  -  Trademark notice.
Feel free - send a Email-NOTE  for any BUG on this page found - Thank you.