Replacing a Faulty Drive (ServeRAID)


Replacing a Faulty Drive

To replace a faulty drive:

Note: The LED on the hard disk drive tray provide information about the status of the drive.
 

The following is a summary of the LED states and their meanings.

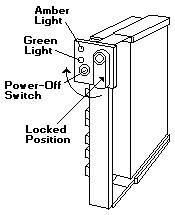
  Green   | Amber   | Description
 ---------|---------|-----------------------------------------------------
   On     |  Off    | Drive tray is powered on, the hard disk drive
          |         | is inactive, and the drive should not be removed.
 ---------|---------|-----------------------------------------------------
 Blinking |  Off    | The hard disk drive is inactive. The hot-swap drive
          |         | can be removed safely.
 ---------|---------|-----------------------------------------------------
   On     | On or   | The hard disk drive is in use, and should not be
          | Blinking| removed.
 ---------|---------|-----------------------------------------------------
   Off    |  Off    | The drive is defective, or no power is being
          |         | supplied to the drive. The hot-swap drive can be
          |         | removed safely.
 -------------------------------------------------------------------------


Check the drive for damage. If the drive is not damaged, check the position of the drive. If it is not inserted correctliy, reposition the drive. Verify that the drive is positioned correctly.

Use the following procedure to replace a faulty drive using the ServeRAID configuration program:

  1.  Start the ServeRAID configuration program. See 'Starting the ServeRAID Configuration Program'.

     If the drive failed while the system was powered down, a message  identifying the defunct drive appears the next time the system is powerd on.

  2.  Physically replace the drive or assign a hot-spare or other appropriate drive as a replacement:

    Note: Removing the wrong hard disk drive can cause loss of all data in the array.

  3.  If you are assigning a hot-spare or another appropriate drive to replace the defunct drive, got to 'Rebuilding a Logical Drive'. If you are physically replacing the hard disk drive, go to step 4.
  4.  Press the power-off switch on the drive tray. When the green LED begins to blink, it is safe to remove the drive.
  5.  Unlock the drive by turning the knob clockwise 90 degrees.
  6.  Disconnect the drive from the connector on the backplane, by grasping the handle on the drive tray and pulling  the drive out of the server. Store the drive in a safe place.
  7.  Install the hard disk drive:

    1.  Move the tra knob to the unlocked position.
    2.  Position the drive tray assembly vertically, with the connector facing the rear of the server.
    3.  Align the side of the tray with the raised guides on the bottom of the bay. (Note the arrows pointing forwards the backs of the bays.)
    4.  Slide the drive tray to the rear of the bay until it connects to the backplane.  Be sure it is connected properly to the backplane.
    5.  Move the tray knob to the locked position.

      Note: The green light on the front of the drive tray illuminates, indicating that the drive was  installed correctly.

  8.  Go to 'Rebuilding a Logical Drive'


Back to  Jump to TOP-of-PAGE

Please see the LEGAL  -  Trademark notice.
Feel free - send a Email-NOTE  for any BUG on this page found - Thank you.