Manually Removing a Tape Cartridge
Manually Removing a Tape Cartridge
If a power failure or a drive failure prevents the tape cartridge from ejecting, you
can remove the cartridge manually.
 -Attention- The following procedure may damage the tape cartridge.
Before using this procedure, attempt to eject the cartridge by pressing the Unload button (and wait for the green Operate Handle light to come on)
or use the appropriate application commands.
If you suspect that a defective power supply has prevented the tape from ejecting, leave the cartridge in the drive and replace the power supply
(see 'Removing and Replacing the Power Supply').
After removing and replacing the power supply, turn on power to the tape library and attempt to remove
the cartridge by pressing the Unload button.
Use the following procedure to manually remove a tape cartridge.
- Make sure the tape library is not performing an operation.
If the tape library is performing an operation, let the tape library complete the operation before shutting off power.
- Turn off the power to the tape library.
- Remove the DLT7000 tape drive that contains the tape cartridge
(see 'Removing and Replacing a Tape Drive').
- Remove the tape drive shroud (see (below) Figure 34):
- Remove the screw securing the shroud to the load plate.
- Depress the shroud tab (the tab is on the opposite side of the screw, behind the printed circuit card).
- Lift the shroud straight up.
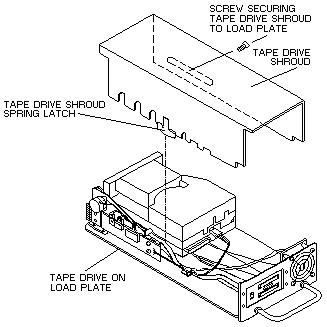
Figure 34. Tape Drive Shroud
- Check to see if the tape is completely rewound.
If so, go to (below) step 10. If not, continue with the next step.
- Ensure that the tape cartridge is fully inserted into the tape drive and that the
cartridge insert/release handle is down.
- Place the tape drive load plate on its side so that the printed circuit card is up,
the front of the tape drive load plate is toward your right hand, and the rear is toward your left hand.
- Insert a #1 Phillips head screwdriver into the hole located at the bottom center
of the tape drive load plate (see (below) Figure 35).
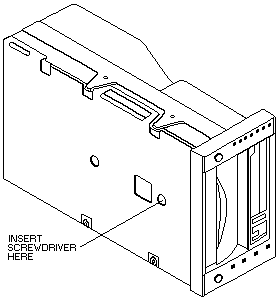
Figure 35. Access Hole in the Tape Drive
- Rotate the screwdriver counterclockwise until you feel the cartridge leader encounter a hard stop.
-Attention- You may feel some initial resistance as the cartridge leader and
drive leader exit the machine reel and enter the tape path.
Do not confuse this potential resistance as the hard stop.
Failure to fully rewind the cartridge leader into the cartridge before removing the cartridge from the tape drive will render
the tape cartridge unusable.
- Place the tape drive load plate on a flat surface, with the bottom side down and the front facing you.
- With one hand, press the interposer (behind the face plate) toward the rear ot
the tape drive and hold it (see (below) Figure 36).
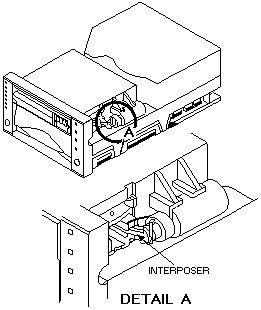
Figure 36. Interposer
- Lift the cartridge insert/release handle with your free hand to its open position.
The tape cartridge ejects approximately 0.75 in. (20 mm).
- Hold the interposer in the open position. Grasp and remove the tape cartridge.
- Return the cartridge insert/release handle to the down position.
Note: If you do not hold the interposer open while lowering the cartridge
insert/release handle, the cartridge door may not fully close.
Close the cartridge door by holding the interposer open, then raise and lower the cartridge insert/release handle.
The cartridge door can also be closed by turning on the power to the tape library (after the drive load plate has
been re-installed), then raising and lowering the cartridge insert/release handle after the drive completes POST.
- Replace the tape drive shroud.
Back to 
Please see the LEGAL - Trademark notice.
Feel free - send a  for any BUG on this page found - Thank you.