 ) key or the Down Arrow (
  )
key to highlight the array you want to define,
then press Enter.
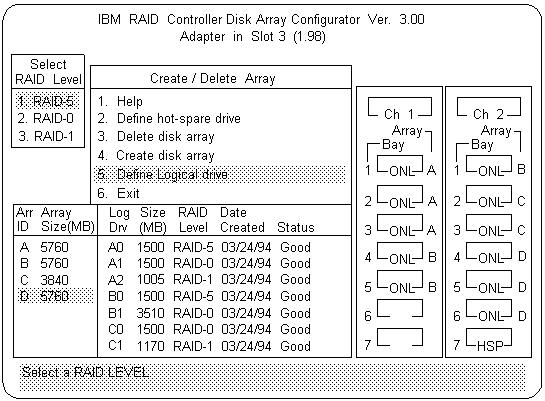
The Select RAID Level pop-up window appears, and
the cursor is active in the window.
)
key to highlight the array you want to define,
then press Enter.
The Select RAID Level pop-up window appears, and
the cursor is active in the window.
NOTE: The system automatically assigns RAID level 0 to any logical drives defined in an array containing only one hard disk drive. When this is the case, the Select RAID Level pop-up window will not appear.
If you have only two hard disk drives in the array, the Select RAID Level pop-up window appears, but RAID level 5 is not selectable because you need at least three hard disk drives in an array to assign RAID level 5 to one of the logical drives. You can define more than one logical drive for the array. The only restriction is that the maximum number of logical drives you can define is eight.
) key or
the Down Arrow ( )
key to highlight the RAID level you want to assign to these logical
drives,
then press Enter.
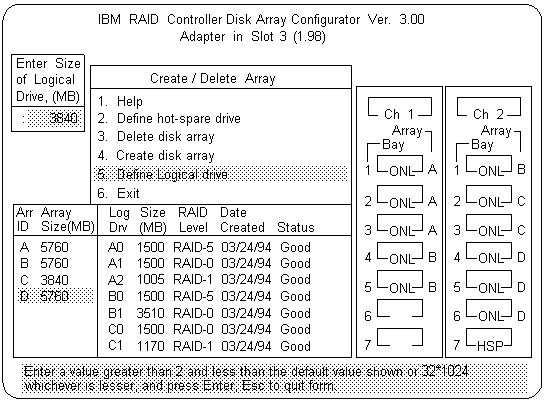
NOTE:
Because the level you assign can influence the space
needed for the drive,
you must assign a RAID level before you enter the size of
the logical drive.
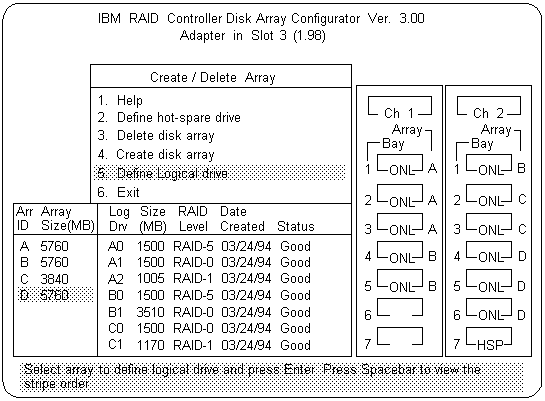
The Logical Drive list contains the logical drive ID, the size of each logical drive, the RAID level you assigned to that logical drive, and the date that the logical drive was created.
The status of the logical drive also is shown. Good means that all is well with the drive. Critical means that you must replace the hard disk drive or do a rebuild operation. (You will have received a message telling you what has happened to the drive.) Offline means that the logical drive is unrecoverable, the data on that drive is lost.
The Logical Drive Size pop-up window shows the space in the array that is available for logical drives.
Information about the new logical drive appears in the Logical Drive list.
NOTE: The size appearing in the Logical Drive list might be different from the size you typed. (binary equivalent) The size of a logical drive is determined by a number of factors, but basically the size must be divisible by the number of drives in the array.
Consider the following scenarios:
Example 1:
The array consists of three 1GB drives.
You assign RAID level 0 (which
uses all the drives in the array with no parity storage), and type
1000MB . The number in the Size (MB) field
will be 999, which is the number closest to and
lower than 1000 that is divisible by 3.
Example 2:
The array consists of three 1GB drives, and you assign RAID level 5.
Data is striped across all three drives in the array, but the space
equivalent to that of one drive is used for
parity storage.
Therefore, if you
type 1000MB , the number in the Size (MB) field
remains 1000 because it is
divisible by 2 (drives), which
is the space available for data.
If you do not use the entire array for this logical drive, you can create another by assigning either the same or a different RAID level for an additional logical drive. You can have as many as eight logical drives among four disk arrays.
- Select Initialize/synchronize array from the Main Menu, then select Initialize logical drive.
- Select the logical drives you want to initialize
from the Logical Drive list by pressing
the Spacebar (the selected drives will appear highlighted).
To start the initialization, press Enter.
A pop-up window appears asking you to confirm your action.
 If you select Yes in the Confirm pop-up
window, information in the
logical drive will be overwritten with zeros.
If you select Yes in the Confirm pop-up
window, information in the
logical drive will be overwritten with zeros.
- Select Yes to confirm that you want to initialize this
logical drive.
The initialization process begins, and you can see its progress in the Pct. Int. (Percent Initialized) column of the Logical Drive list.
- To stop the initialization at any time, press Esc. Then press Esc again to return to the menu, or press Enter to continue initializing the drive.
- Select Advanced functions from the Main Menu.
- Select Backup config. to diskette.
Follow the instructions on the screen. A pop-up window shows the default file name of CONFIG. You can change the file name by typing over the default. The Backup program will assign a file-name extension of .dmc .
